This article is to look at the problems with PSModulePath when installing PowerCLI 6.0 on Windows 10 (I’m aware that it is not yet certified for Win 10). The problem does not occur with the NetApp Data ONTAP PowerShell Toolkit (as noted at the bottom).
On a clean installation of Windows 10 we can observe the following behaviour with regard to PSModulePath:
[Environment]::GetEnvironmentVariable('PSModulePath') -split ';'
C:\Users\DefaultAdmin\Documents\WindowsPowerShell\Modules
C:\Program Files\WindowsPowerShell\Modules
C:\Windows\system32\WindowsPowerShell\v1.0\Modules\

[Environment]::GetEnvironmentVariable('PSModulePath','User') -split ';'

[Environment]::GetEnvironmentVariable('PSModulePath','Machine') -split ';'
C:\Windows\system32\WindowsPowerShell\v1.0\Modules\
The first command line translates to $env:PSModulePath. When PowerShell loads, it dynamically sets this session only variable equal to the following:
$home\Documents\WindowsPowerShell\Modules ($home is something like C:\Users\username)
$pshome\Modules ($pshome is the location of PowerShell, typically C:\Windows\System32\WindowsPowerShell\v1.0)
Based on the output above it also appends the contents of the system wide, SYSTEM environment variable for PSModulePath.
The second command line retrieves USER environment variable called PSModulePath (available to all users of the system), and as you can see there is none set. If there were one, it would prefixed to $env:PSModulePath (i.e. it would be the first path visible in the output of the first command).
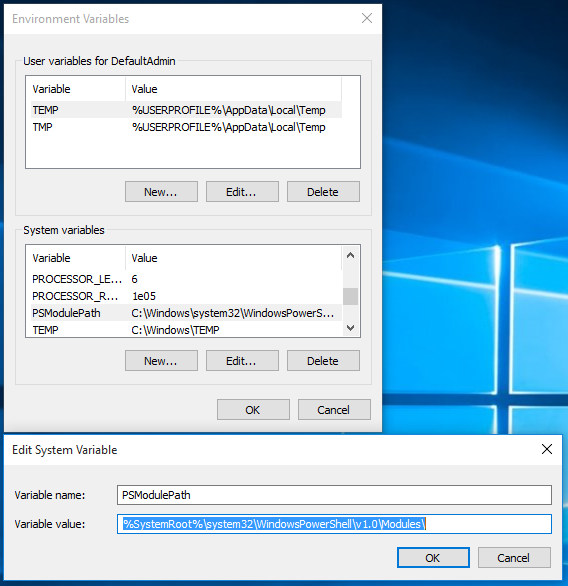
The last command here retrieves the SYSTEM environment variable called PSModulePath. It is also present in the GUI here:
$env:PSModulePath is a rather important variable that is used not only for querying for available modules, but also module autoloading and tab completion of commands.
Sadly after manually installing PowerCLI (version 6.0.0-3056836) by running the exe as a local administrator as many would do, the behaviour of PowerShell on load is changed (some might call it broken!). Running the same query above we see:
[Environment]::GetEnvironmentVariable('PSModulePath') -split ';'
C:\Windows\system32\WindowsPowerShell\v1.0\Modules\

[Environment]::GetEnvironmentVariable('PSModulePath','User') -split ';'

[Environment]::GetEnvironmentVariable('PSModulePath','Machine') -split ';'
C:\Windows\system32\WindowsPowerShell\v1.0\Modules\
C:\Program Files (x86)\VMware\Infrastructure\vSphere PowerCLI\Modules
The SYSTEM environment variable for PSModulePath is modified, nothing is created for the USER environment variable for PSModulePath, and critically PowerShell no longer performs any customisation of $env:PSModulePath! The paths:
C:\Users\DefaultAdmin\Documents\WindowsPowerShell\Modules
C:\Program Files\WindowsPowerShell\Modules
are now gone.
This post on the VMware Community Forums 7 months ago seems to suggest the behaviour of PowerCLI on Windows 8.1 is different (or perhaps an older version of PowerCLI?):
The PowerCLI 6.0 installer does create a USER PSModulePath variable if one does not already exist.
… we can see at least on Windows 10, under the current version, it does not.
There is advice on the VMware PowerCLI blog under the v6 release which suggests:
#Save the current value in the $p variable.
$p = [Environment]::GetEnvironmentVariable("PSModulePath")

#Add the new path to the $p variable. Begin with a semi-colon separator.
$p += ";C:\Program Files (x86)\VMware\Infrastructure\vSphere PowerCLI\Modules\"

#Add the paths in $p to the PSModulePath value.
[Environment]::SetEnvironmentVariable("PSModulePath",$p)
The problem with this is that when calling SetEnvironmentVariable there is no target specified so it only updates the local session variable (i.e. $env:PSModulePath). This would therefore be required in every script (not ideal). Also we’ve established that installing PowerCLI has broken the population of this variable somehow. The best workaround is already in the comments; running the above code but targeting the SYSTEM variable for PSModulePath (i.e. [Environment]::SetEnvironmentVariable("PSModulePath",$p,'Machine')).
Now, if I repeat this process after installing the Netapp Data ONTAP PowerShell Toolkit (3.2.1.68) (accepting a UAC prompt), I get the perfect behaviour:
[Environment]::GetEnvironmentVariable('PSModulePath') -split ';'
C:\Users\DefaultAdmin\Documents\WindowsPowerShell\Modules
C:\Program Files (x86)\NetApp\Data ONTAP PowerShell Toolkit\
C:\Program Files\WindowsPowerShell\Modules
C:\Windows\system32\WindowsPowerShell\v1.0\Modules\

[Environment]::GetEnvironmentVariable('PSModulePath','User') -split ';'

[Environment]::GetEnvironmentVariable('PSModulePath','Machine') -split ';'
C:\Program Files (x86)\NetApp\Data ONTAP PowerShell Toolkit\
C:\Windows\system32\WindowsPowerShell\v1.0\Modules\
PS C:\Users\DefaultAdmin>
I think the appropriate clever people at VMware and NetApp need to have a chat with each other :)
Note: If I right click the PowerCLI installer and “Run as Administrator” I get the same behaviour.
Note: The Cisco UCS PowerTool also breaks the PSModule behaviour (using version CiscoUcs-PowerTool-1.5.1.0).